Thursday 19 January 2017

Evaluation Question 1

On my Front Cover I adhered to quite a few conventions. My masthead adhered to convention as it was positioned at the top of the page, occupying the entire width of it and sat behind the models head, which was a convention I was very keen to follow. I also adhered to convention by having my model look directly into camera, and pose with a genre appropriate prop. I feel this works really well, and represents my genre well. I also adhered to the convention of having a banner across the top of my cover to display information about the magazine; in this case where a free downloadable copy was available. I felt it very important to adhere to this convention, as it would appeal to my target audience. Also, I felt it very important to adhere to the convention of placing cross-media convergence on my front cover, via different social media site logos, again appealing to my target audience.


However, I did break a couple of conventions on my Front Cover. For example, I felt the convention of studio shots for Front Cover photos needed to be challenged in my magazine, as a way of making my cover more exciting and appealing to younger audience. For this reason, I shot my cover photo on location. I also challenged the convention of black/white front cover colour schemes. Again, I felt this necessary to engage younger audiences, and to create synergy with the cover star, as the shade of pink used was lifted directly from her lipstick.


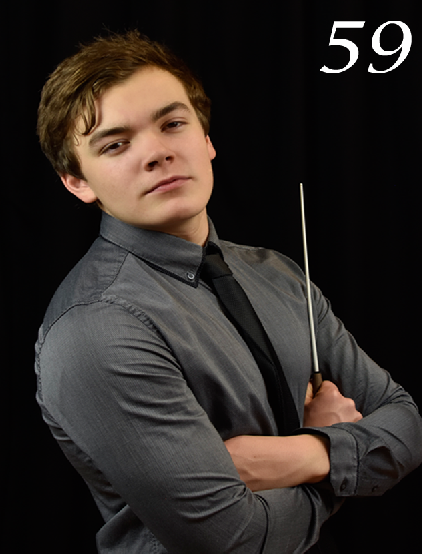
For my Contents Page I also adhered to a few conventions. Images 44, 59, and 27 all follow convention as the models are looking into camera wearing genre appropriate costumes and using genre appropriate props (44 & 59), and the subject of image 27 is genre related. The texts used on the Contents Page also adhere to convention as they are  sans serif fonts
. I felt this was necessary as it enabled me to appear professional and follow an appropriate convention. I also adhered to the convention of placing an image of the front cover on the contents page, next to the institutional details and subscription box. I felt this was a good convention to adhere to as it made my magazine identifiable to the target audience as a music magazine.


I did challenge a couple of conventions on my Contents Page too. Image 36 breaks convention as the subject is not looking into camera, however I felt this an appropriate convention to break as I wanted to vary the style of shot used, and it also followed the style of music the image is trying to represent
. The colour of the text on the Contents also challenges conventions. Generally, text is black, however I felt that by creating synergy with the Front Cover and challenging the colour convention I would be engaging my target audience more and making the design of the magazine more appealing.


For my DPS I followed many conventions. I included a drop capital, columns, pull quotes, and a stand first in my article so that the reader could instantly recognise the page for what it was meant to be. I felt that risking challenging these conventions would jar stylistically with the magazine, and make the DPS feel incomplete. I also adhered to the convention of text wrapping in the DPS. I felt that this was a necessary convention to adhere to due to the finished and professional look it gave the article, as well as appropriately filling in white space. The page numbers and institutional details at the bottom of the page also adhere to convention, something I challenged in earlier drafts, but decided to adhere to for my final version.


I challenged a couple of conventions on my DPS. The pink fade used to highlight the article text breaks convention as the article is usually placed on a solid background not a faded one, normally white, however I wanted to challenge this convention in order to create synergy with the rest of my magazine and also make the design of the page more interesting, drawing readers to it. I also challenged the convention of font colour, by using white and black fonts on the same page. This is something I wanted to do as it highlights the pull quotes, and differentiates between them and the main article, indicating to readers what to read and when.

Monday 16 January 2017

Evaluation Question 2


I do not believe that my representations of my female Star Image complies with Mulvey's male gaze theory, as she is not posing voyeuristicly or dressed in a way that would specifically appeal to a male audience.

The props used for the photographs in my magazine are all traditional classical music props, except for the Taiko drum. I chose to do this as I wanted to appeal to both traditional classical music fans, whilst also containing items to appeal to fans of the more modern variety of classical music.

Sunday 15 January 2017

Evaluation Question 3

After completing a second research into Media Institutions, I have come to a conclusion about which one I feel most suitable to distribute my magazine.


Upon reflection, I feel Bauer Media Group would be the best choice to distribute my magazine for a few reasons. One reason is their use of cross-media convergence in existing magazines. This is something they do particularly well with, incorporating sites such as Facebook, Twitter, and Snapchat into their magazines so the reader can interact with the magazine in more ways than through the pages. This also allows the magazines to become more customised to the audience as it allows for polls to be conducted for contents of the next issue, or for feedback to received and acted upon quicker.


Another reason is the price Bauer typically sell their magazines for. A standard magazine published by the group tends to be sold for a price in the region of £2-£3, which is more inline with the answers I received from my target audience research. This means that, by choosing Bauer, a greater percentage of my target audience would be able to purchase the magazine as it falls within their price range, allowing a wider spread audience and perhaps more profit in the long run.


Furthermore, magazines published by Bauer tend to be aimed at a target audience that is more aligned with mine. Magazines such as 'Q' and 'Kerrang!' appeal to a younger audience, and I feel that this would be perfect for my magazine owing to the Star Image and content. I could use the publishers
expertise to really grab the largest target audience possible, allowing my magazine to become commercially successful and perhaps encourage more people to take up classical music.


I believe that Bauer would be the best Institution to distribute my magazine locally and nationally as they own lots of Radio Stations (including 'Viking' and 'Radio Hallam', both of which are local to me) on which they could advertise my magazine. They also own TV channels '4Music' and 'Kiss', both of which attract my target audience, which would be ideal for marketing my magazine. If I were to sell my magazine globally, Bauer would also be an excellent choice of Institution, as they own over 100 Radio Stations and 400 digital media platforms in 16 countries spread over 4 continents worldwide, which widens my perspective target market even further.


The final reason for wanting to choose Bauer is the fact that they don't currently sell a magazine for the classical genre. This makes my magazine ideal for Bauer to take on as it would fill the whole in the market currently created by a lack of magazine in this genre. Bauer would make money off it as there is the audience for the genre, and therefore would be the ideal institution to produce my magazine.

Sunday 8 January 2017

Evaluation Question 6

In order to create my magazine I used a range of different programmes and technology. I will list these below:

  • Gmail
  • Blogger
  • Slideshare
  • Powerpoint
  • Prezzi
  • Thinglink
  • Powtoon
  • Lumix Camera
  • Tripod
  • Memory Card
  • Memory Card Readers
  • Studio Light Setup
  • Adobe Elements 11
The Gmail account was vital to the creation of my magazine. Without it, I would have been unable to join sites such as Blogger, Slideshare, or Prezzi and would therefore have been unable to complete my research on existing magazines, and thus by extension the pages of the magazine itself due to a lack of knowledge and research into existing products and code and conventions.

I used Blogger as a means of communicating my research and constructions. If I were creating my magazine for a media institution I would have used Blogger to build and communicate with my audience, asking them for feedback and input so the magazine was more suited to what they wanted. However, as this was not the case, I used this platform to keep a record of all my work.

Platforms such as Prezzi, Thinglink, Powtoon, and Slideshare allowed me to present my research and planning in ways that allowed me to develop them further than the standard text and screengrab method. I did use this method at times though, and I found it to be useful, as it allowed me to structure my research and planning in a way that was familiar to me making interpreting my research later a more streamlined process.

When it came to shooting the photos for my magazine I used a Lumix Camera, Memory Card, and a Tripod for the location shoot. I used this set up for the studio shoot, and added a lighting set up to enable the photos to be correctly lit. The standard of the equipment enabled me to get the high quality of shots required for the magazine, and I was very happy with the results.

During the editing process I used Adobe Elements 11 to create my magazine. I edited the photos using the spot healing tool to remove any blemishes on my subjects skin. This was a fantastic tool, that enabled me to significantly improve the quality of my photos by not only removing blemishes from my subjects skin, but also by allowing me to remove any leaves on the DPS that clashed with the rest of the image, and by allowing me to erase an unwanted design on the front of my Taiko player's shirt, all of which gave my images a more tidy and professional look.

As well as this, I also used the gradient tool to create the pink fade on the DPS. This was a great tool for me, as it allowed the text on my DPS to be seen (as this was something I was struggling with), whilst still allowing the background behind it to be seen as well. I was very conscious of loosing the entirety of that side of the image to a wall of solid colour, so the gradient tool was the ideal solution, as it allowed my to blend the two backgrounds together to create a successful effect. I also used the opacity tool to fade the Also Inside box on the Front Cover to create a similar effect for the same reason, however I wanted the box to sit on top of the image as apposed to blending in to it, which is why I went for this tool on this occasion.

Being able to use the colour picking tool to lift the shade of pink from my models lipstick turned out to be a vital part in the development of magazine, as it enabled me to create a strong sense synergy and a brand identity throughout my magazine. I found this tool incredibly useful as it enabled me to capture the exact colour I wanted, leaving no room for slight discrepancies which could have ruined the brand identity and synergy. It was also very simple to use, as it enabled me to use the colours in any way I wanted, simply by clicking on the colour I wanted.

The shape tool was vitally important to the creation of my magazine, as it enabled me to create puffs and banners to advertise free giveaways, my magazine's website, and my subscription section all in my magazine, which was vital for following well established conventions.

Much like the shape tool, the text tool was vital to the creation of my magazine, as without it I would not have been able to input any text onto my pages which is essential for a magazine. It allowed me to manipulate my text easily, so I could place it anywhere on my pages, in any style, font, or size, allowing me to either adhere to or break conventions of particular sections.

Friday 6 January 2017

Evaluation - Question 7

In my preliminary task I created a college magazine, and I feel I have developed significantly from this first attempt to the completion of my final product.

In my preliminary task, I used a picture that had a lot of white space above the subject. Whilst this in itself was not an issue, the way I used it was. There was nothing placed in the white space to fill it, and as a result my cover looks bare, empty, and boring. When compared to my final product, it is evident that my final magazine makes much better use of the white space. To begin with, there isn't as much white space on my cover as I made the picture fit the page a lot better. However, what white space there is, is utilised a lot better, by having a masthead that fills the page a lot more effectively and by having a banner across the top which fills more of the white space that was left bare on my prelim task. As a result of this, my cover is a lot more interesting to perspective readers, and more likely to draw them in.

 
Furthermore, in my prelim task I used the same font for all items on the cover. After researching many different magazines, I saw this was not the convention, and again made my cover look dull and boring. I decided to change this for my final front cover, and therefore I used a range of fonts (both serif and sans serif), all selected to represent my genre. I feel the use of a range of fonts is a much better choice than just having one font, and therefore makes my magazine look more professional. Also, the colours of the text on my preliminary cover were dull, and did not compliment the image well. Upon reflection, placing yellow font on a blue puff was not the correct choice, and therefore I would look at changing the colour of the puff/text/both in order to compliment the image more, perhaps picking the colours from my subjects jumper if I were to try this again.

Upon reflection, the puff used in my prelim task was way too big. Once again, after studying many magazines, I made the puff on my final magazine much smaller, which gave my magazine a more professional look. Also, on my prelim cover, the text does not fit on to the puff, giving my cover an untidy look. When compared to this, the text on the puff on the final front cover is much smaller, thus fitting inside the puff, giving my cover a much tidier and professional appearance.

Friday 9 December 2016

DPS Draft 5

Pictured left is the final DPS. I am really happy with this, and feel that the addition of the lines and the changing of the page numbers really works well, and finishes the page off. To make this my final draft I need to fill in the white space in the bottom right corner, and also add the magazine website to the page somewhere.

Thursday 8 December 2016

DPS Draft 4

Pictured left is my fourth draft of my DPS. I really like this draft, however it could still be improved. I need to seriously consider if the page furniture I have selected really fits on the page, and I may end up removing this. Also, I don't think the pull quote under the arm of the subject works, so I will probably remove this. Even though I have created symbolism through the page numbers (they are supposed to represent time signatures in sheet music), I feel that this could be confusing to readers. For this reason, I may remove them from my page. I also need to add lines the separate the columns, and follow convention.

Wednesday 7 December 2016

DPS Draft 3

Pictured left is the third draft of my DPS. To improve this, I need to think about the positioning of my pull quotes,  change how the page numbers are displayed, add institutional details to the bottom of my page, and maybe move the stand first.

Tuesday 6 December 2016

DPS Draft 2

Pictured left is the second draft of my DPS. I don't really feel the image works, so to improve I could find a new image. I will also look at using different fonts to suit the new image. The new image will make me have to reconsider the amount of columns I use, and where I place my pull quotes and stand first.

Monday 5 December 2016

DPS Draft 1

Pictured left is the first draft of my DPS. To improve this, I could create synergy with the rest of my magazine by using the pink that I have used throughout, and also by removing the lines in between the columns.

Saturday 3 December 2016

Contents Page Draft 5

Pictured left is the fifth draft of my contents page. I am really happy with the way this draft looks, and I believe that adding the picture of the front cover really compliments the page well. I feel that all the fonts work well together, and the colours create synergy perfectly. To make this my final draft I need to change the font for the article headings, as well as change the picture for page 36.

Friday 2 December 2016

Contents Page Draft 4

Pictured left is my fourth draft of my contents page. I really like this draft, as I think the lines and the box that I have added really compliments the page, however it could still be improved. I need to add a picture of the front cover to my contents page, around the Free Subscription section which would really compliment that section well.

Thursday 1 December 2016

Contents Page Draft 3

Pictured left is my third draft of my contents page. To improve this I need to add lines that separate the columns, as well as sort out the page furniture and change the font of the title. I also need to add a box for my free subscription section.

Wednesday 30 November 2016

Contents Page Draft 2

Pictured left is my second draft of my contents page. To improve this I need to add a photo in the bottom left corner, as well as change the page furniture. I also need to add a free subscription section.

Monday 28 November 2016

Contents Page Draft 1

Pictured left is my first draft of my contents page. To improve I could add a photo in the bottom left corner, add some page furniture, and maybe have a play around with some of the fonts on the page.